
ETHA Light Switch uses the MQTT protocol to send and receive messages to and from the ETHA Manager Android app and the ETHA Light Switch Python program running on the Raspberry Pi Zero W.
MQTT uses a so-called broker to connect two or more clients to each other. A client can publish a message on a certain topic. Another client can subscribe to that same topic to receive those messages. A client can both publish on and subscribe to that (or another) topic at the same time.

A major advantage of the broker concept (at least for the ETHA Light Switch) is that clients don’t have to know anything in advance about other clients. No client IP address is needed to communicate with that client. Of course the IP address of the broker is still a prerequisite, but you need only one MQTT broker in a network with many clients (in our case many ETHA Light Switch time switches can be managed from many ETHA Manager Android apps with just one MQTT broker).
So in order to use ETHA Light Switch you’ll have to choose an MQTT broker and provide the following information on both sides of the system (in the Android app and the Python program):
- The IP address or hostname of the MQTT broker.
- The protocol that is used to communicate. This can be plain TCP or SSL over TCP. TCP transfers all information in the clear, so this might not be a good idea if your infomation (including username and password) traverses the internet. With SSL over TCP your information will be encrypted.
- The port number that the MQTT broker is listening on.
- A username and password. This may not be necessary in all cases. The advantage of authentication is, however, that you can control who is using your system.
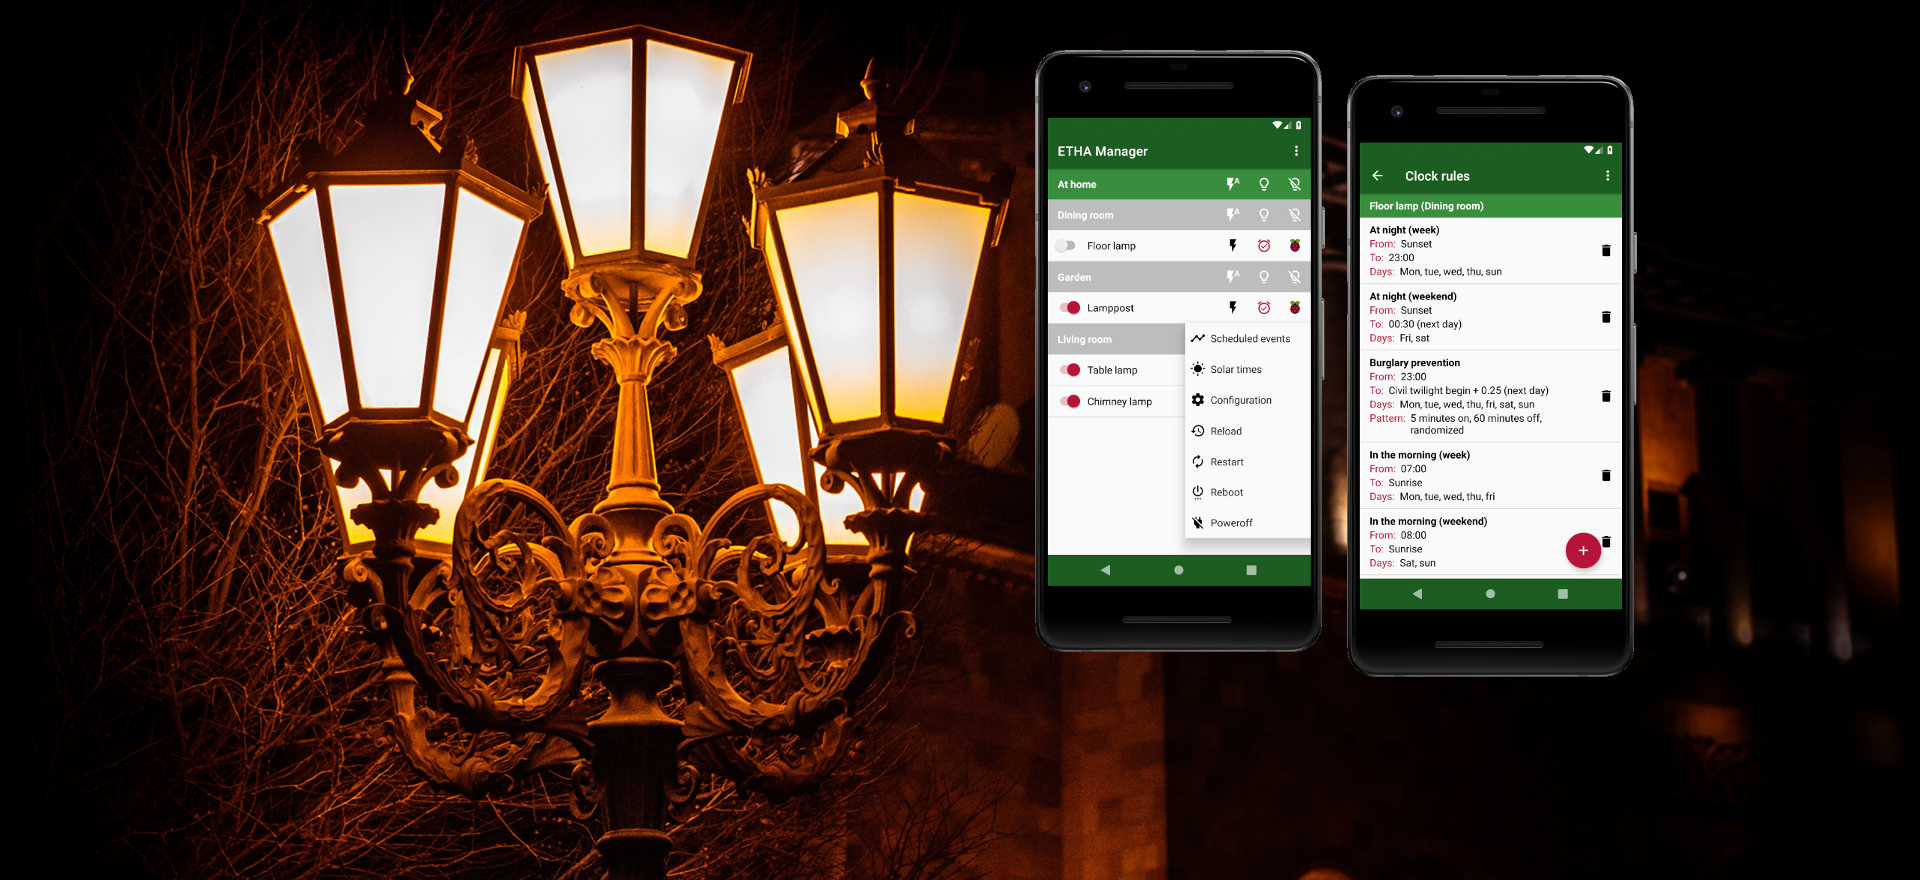
- Finally, you need to provide a topic. In the Android app it is only necessary to provide a base topic. The Android app subscribes to
base-topic/#. The#is a wildcard. It means that the Android app receives all messages published on topicbase-topicand all topics that begin withbase-topic/.
The Python program subscribes to:base-topic/broadcast. This is used for receivingidentifymessages from the Android app. With this message the Android app inspects which ETHA Light Switch time switches are active and reachable.base-topic/device-topicif the ETHA Light Switch time switch is not a member of a group. The device topic uniquely identifies the time switch.base-topic/group-topic/device-topic. An ETHA Light Switch time switch can be a member of a group to group together several time switches. In that case the time switch does not subscribe tobase-topic/device-topic.base-topic/group-topic. If the ETHA Light Switch is a member of a group, it will also listen to this topic (for example to turn all the lamps in one group on or off at the same time.
Choosing an MQTT broker
So when you’re building the ETHA Light Switch you are going to use an MQTT broker. You basically have two choices:
- Using an external MQTT broker.
There are multiple MQTT brokers on the internet that provide a paid or free service. I’m not going to recommend any, because I presume you know how to use Google to find them. I do, however, recommend that you use a service that allows you to create your own MQTT topics that are protected by your username and password. I also recommend that you use SSL as the communication protocol.
- Installing and using your own MQTT broker.
Somewhere in your LAN you can install and configure your own MQTT broker. This can be on pretty much any device as long as the device is always on. You can, for instance, install an MQTT broker on an OpenWrt router.
The obvious solution is, of course, installing an MQTT broker on the ETHA Light Switch you’re building. You’ll need only one MQTT broker, so if you are going to build multiple ETHA Light Switch time switches, only one of them needs to have an MQTT broker installed.
Mosquitto running on ETHA Light Switch Raspberry Pi Zero W
There are more solutions, but here I’m describing how to install and configure the Eclipse Mosquitto MQTT broker on a Raspberry Pi Zero W running ETHA Light Switch.
First, we need to install it. So open your ssh connection to the Raspberry Pi Zero W (see here) and enter: apt-get install mosquitto. Once installed you can start Mosquitto with: systemctl start mosquitto. Mosquitto will start listening to TCP connections on port 1883.
In the default configuration Mosquitto doesn’t have any user or topic checks. Anonymous users can publish on and subscribe to any topic. If this is not what you want, you’ll have to change the configuration. This can be done by creating any file with extension .conf in the directory /etc/mosquitto/conf.d/. You can also get an example configuration file by executing:
gunzip -c /usr/share/doc/mosquitto/examples/mosquitto.conf.gz > /etc/mosquitto/conf.d/mosquitto.confThe newly created file /etc/mosquitto/conf.d/mosquitto.conf consists only of comments, but you can add options in between the comments or by removing the # before an option.
First of all, I think it’s important to restrict access to Mosquitto. To do this, you should add allow_anonymous false to the configuration file. Once that is done, you’ll need a username and password:
mosquitto_passwd -c /etc/mosquitto/passwd ethamosquitto_passwd will ask for a password for user etha and create the file /etc/mosquitto/passwd. Next time you shouldn’t use the -c (create) option as this will recreate the file. Note: a hash value is stored in the password file, not the password itself.
Next, edit the configuration file to inform Mosquitto of the new password file: password_file /etc/mosquitto/passwd. You can define several users with different passwords for various users of the Android app. One username/password combination should be reserved for the ETHA Light Switch Python program on the Raspberry Pi Zero W.
You can restrict users to only publish on and subscribe to certain topics. To do that, create an access control list file: /etc/mosquitto/aclfile. The contents of this file should look like this:
user etha
topic home/lights/#

user alice
topic home/lights/#

user bob
topic home/lights/broadcast
topic home/lights/dining-room/#

user carol
topic home/lights/broadcast
topic home/lights/dining-room/standing-lamp
The topic home/lights is the base topic as described above. User etha in this example is the user defined in the ETHA Light Switch Python program. User alice can see and control all ETHA Light Switch time switches from her Android app, whereas user bob can only see and control the time switches in the group dining-room. User carol is restricted to only the time switch standing-lamp in the group dining-room. All users should have access to home/lights/broadcast in order to use the Android app at all.
Now inform Mosquitto of the existence of the access control list file by adding acl_file /etc/mosquitto/aclfile to its configuration file. At this time only users specified in /etc/mosquitto/passwd have access to the topics specified in /etc/mosquitto/aclfile. All other access is prohibited.
Mind you, this can be extremely difficult to detect and debug! Clients are not notified when subscriptions are prohibited according to the access control list. When a client subscribes to a prohibited topic, it just doesn’t get any messages on that topic. Even the Mosquitto log is silent. Mosquitto (and other MQTT brokers) even sends a suback to the offending subscription. That is just the way the MQTT protocol is defined. So if the Python program or the Android app don’t receive any messages, look in the Mosquitto log. When you see Received publish from one client that is not followed by Sending publish to another (connected) client, you probably have a violation of the access control list on your hands.
It’s easier to detect a failing publish attempt. In this case, the client is also not notified (from the client’s perspective everything is working fine), but you can see a Denied publish in the Mosquitto log.
So keep all this in mind when you are testing and wondering why it doesn’t work!
Access to the Mosquitto MQTT broker
As we’ve installed Mosquitto on the ETHA Light Switch Raspberry Pi Zero W, we need to have access to it from the Android app. In the default configuration, however, the Raspbian (Linux) operating system will get its IP address from a DHCP server which hands out random IP addresses. That means that when you reboot Raspbian, its IP address could be a different one. So it is important to use a fixed IP address. This can be accomplished in more than one way:
- Modify a setting in your router. This is depending on which router you are using, so you’ll have to look it up in the manual or on the internet. This could be called DHCP IP Reservation or something similar. In most cases it boils down to matching the MAC address of your Raspberry Pi Zero W with a fixed IP address in the IP range of your LAN. You can get the MAC address by issuing:
nmcli -f GENERAL.HWADDR dev show wlan0(I presume you have installed NetworkManager, as this is a prerequisite for the ETHA Light Switch Python program). - Give your Raspberry Pi Zero W a static IP address. This can easily be done by using the text-based user interface utility
nmtui. First, however, you can use the commandnmcli device showto show the current settings and note the gateway IP address and the IP address of the DNS server. Then issue thenmtuicommand and change the IPv4 configuration toManualand supply an IP address. This IP address should be outside the range of IP addresses your DHCP server hands out. Also supply the gateway (usually the internal IP address of your router) and the IP address of a DNS server noted in the previous step. Then reboot to check if you still can connect to your Raspberry Pi Zero W. - The very best solution is setting up your own DHCP and DNS servers, and let your DHCP server dynamically update your DNS records. This way you can address all your network devices by using a fully qualified domain name. This, however, is a long and winding road, practicable only for advanced Linux users, and very much outside the scope of this project.
At the risk of stating the obvious, only the device that has Mosquitto running needs a fixed IP address or a (DNS) domain name. All MQTT clients will then be able to reach each other.
Now that your MQTT broker has a static IP address , you can also decide to make it accessible from the internet. For that, you’ll have to edit some settings in your router to forward IPv4 traffic on port 1883 from the internet to the IP address of your MQTT broker. Usually this is called something like Forwarding in your router’s settings.
But if your MQTT traffic is not limited to your LAN, you’d better have some kind of encryption in place, because it is generally not a good idea to send a username and password across the internet in the clear. Luckily Mosquitto can be configured to use SSL (on port 8883). This is outside the scope of this project, however.
Testing Mosquitto
During the testing phase you can start Mosquitto from the command line to see what’s going on: mosquitto -v -c /etc/mosquitto/conf.d/mosquitto.conf. It can also be helpful to start ETHA Light Switch from the command line in another terminal: /opt/etha-light-switch.
A nifty little utility to help test your Mosquitto setup can be obtained by: apt-get install mosquitto-clients. Now you can both publish on and subscribe to Mosquitto by issuing commands like:
mosquitto_sub -t home/lights/lamp -h localhost -u etha -P raspberry -p 1883
mosquitto_pub -m "Test messages on home/lights/lamp" -t home/lights/lamp -h localhost -u etha -P raspberry -p 1883
Of course you’ll have to substitute several options with your own (for instance password and topic).